使用中文
# -*- coding: utf-8 -*- 告诉Python解释器,用UTF-8编码读取源代码print u'中文' u表示Unicode字符串
Python说明
Python代码的缩进规则说:最好使用4个空格ipython --pylab 导入了numpy(np) 和 matplotlib
基础知识
预备基础知识
若自定义函数没有return,函数执行完毕后返回None
保持字典顺序不变使用OrderedDict
1
2
3
from collections import OrderedDict
print dict([('a', 1), ('b', 2), ('c', 3)]) #Random
print OrderedDict([('a', 1), ('b', 2), ('c', 3)]) #Ordered命令行参数:
1
2
3
4
5
6
7
8
import sys
if __name__=="__main__":
print len(sys.argv)
for i in sys.argv:
print i,
#save as test.py
#python test.py
#result: 1 2 3用r’…’来抑制转义
比如path = r'C:\xzhou\Desktop'关于布尔运算
Python把0、空字符串’’和None看成 False
其他数值和非空字符串都看成 True
不过不要完全依赖这一点List
1
2
3
4
5
6
7
8
9
10L=['Michael', 'Bob', 'Tracy'] # 创建List
#可用索引 L [0], L [2], L [-1], L [-3], L [0:3]
L [-1::-1] #得到 L 的逆序['Tracy', 'Bob', 'Michael']
L [::-1] #得到 L 的逆序['Tracy', 'Bob', 'Michael']
L [-1:0:-1] #得到['Tracy', 'Bob']
L .append('Paul') #改变了L
L .insert(0, 'Paul') # 改变了L L 现在为['Paul', 'Michael', 'Bob', 'Tracy', 'Paul']
L .pop() #返回'Paul' L 现在为['Paul', 'Michael', 'Bob', 'Tracy']
L .pop(0) #返回'Bob' L 现在为 ['Michael', 'Bob', 'Tracy']
L [2] = 'Paul' # L 现在为['Michael', 'Bob', 'Paul']
迭代列表:1
2
3a=range(10)
for i in iter(a):
print i
列表的拼接(str,tuple也可以这样,dict和set不行):1
2
3
4
5
6a = []
b = [1,]
c = [2,3]
print a+b+c #[1,2,3]
print c * 2 #[2,3,2,3]
print []+[[1,2],[3,4]]+[[5,6],[7,8]] #[[1,2],[3,4],[5,6],[7,8]]
- Tuple
Tuple没有append()方法,也没有insert()和pop()方法。
获取Tuple元素的方式和List一样,可以使用 t[0],t[-1]等索引方式访问元素,但是不能赋值成别的元素
Tuple和List一样,可以包含 0 个、1个和任意多个元素
t = ()对应s=[]
t=(1,)对应s=[1], 为了防止歧义而不使用(1)
不过当Tuple包括非Tuple类型时可改变
如t = (‘a’, ‘b’, [‘A’, ‘B’])可改变[‘A’, ‘B’]内的元素
但t = (‘a’, ‘b’, (‘A’, ‘B’))不可以
dict
len(d)得到字典长度
d.get(‘Bart’)得到’Bart’对应的键,不存在返回None1
2
3
4
5
6
7
8
9
10
11
12
13
14
15
16
17d = {'a':[1,2],'b':['hello','xiao',3]}
print d.items()
# 遍历键
for key in d:
print key,
# 遍历键值
for key, value in d.items(): #创建迭代器,效率更高
print key,value
# 更快的遍历键值,也省内存
for key, value in d.iteritems(): #创建迭代器,效率更高
print key,value
# 遍历值
for v in d.values():
print v,
# 更快速的遍历值,也省内存
for v in d.itervalues():
print v,另外值得注意的是key只能选择不能被改变的数据类型如整数、字符串、Tuple,不能用List
set类型
因为强调的事并集,所以排序无规律也不支持索引
支持 len(s), ‘A’ in s 等
set的内部结构和dict很像,唯一区别是不存储value,因此,判断一个元素是否在set中速度很快。
set存储的元素和dict的key类似,必须是不变对象,因此,任何可变对象是不能放入set中的。
最后,set存储的元素也是没有顺序的。
适用场合:让用户输入星期一至星期日的某天,判断用户的输入是否是一个有效的星期?
更新set: 增加元素是s.add(‘A’), 删除是s.remove(‘A’), 删除的元素不在set中,remove会报错
定义可变参数函数:
1
2
3
4
5
6def fn(*args):
print args
fn() #()
fn('a') #('a',)
fn('a', 'b') #('a', 'b')
fn(['a', 'b']) #(['a', 'b'],)enumerate 很有用的函数,用于索引、迭代
zip()函数
可以把两个 list 变成一个 list,类似于转置1
2zip([10, 20, 30], ['A', 'B', 'C'])
# [(10, 'A'), (20, 'B'), (30, 'C')]列表生成式:
1
2
3
4[x * x for x in range(1, 3)] #[1, 4, 9]
[x * x for x in range(1, 6) if x % 2 == 0] #[4, 16, 36]
[m + n for m in 'ABC' for n in '123'] #['A1', 'A2', 'A3', 'B1', 'B2', 'B3', 'C1', 'C2', 'C3']
{phone:i for i, phone in enumerate(set(y))} 搭配字典哦😯变量可以指向函数:
1
2
3
4
5
6len=abs
#len([1,2,3]) 报错
print len(-5) #5 说明函数名就是指向函数的变量
def g(a,b,f): #高阶函数(可以接受函数的函数)
return f(a)+f(b)
print g(-3,6,abs) #9map函数(同Mathematica的Map):
map(lambda i:i**2, [1, 2, 3]) #得到[1, 4, 9]- reduce函数(类似Mathematica的Fold):
1
2reduce(lambda i,j:i+j, [1,2,3],10) #16 Fold[#1 + #2 &, 10, {1, 2, 3}]
reduce(lambda i,j:i+j, [1,2,3]) #6 Fold[#1 + #2 &, {1, 2, 3}] filter函数(类似Mathematica的Select :
1
2
3filter(lambda i:i%2==0, range(10)) #[0, 2, 4, 6, 8]
filter(lambda str:str and str.strip()>0, ['test', None, '', 'str', ' ', ...: 'END'])
#输出['test', 'str', 'END']sorted函数可以用来排序:
1
2
3
4
5
6sorted([1,5,2,5,9]) #输出[1, 2, 5, 5, 9]
sorted([1,5,2,5,9],lambda i,j:cmp(j,i)) #输出[9, 5, 5, 2, 1]
sorted([1,5,2,5,9],lambda i,j:cmp(i,j)) #输出[1, 2, 5, 5, 9]
# Application
a = ['5_3','2_6','4_9','2_1']
sorted(a, key = lambda i: (i.split('_')[0], i.split('_')[1]))返回函数的函数
1
2
3
4
5
6
7def calc_prod(lst):
def lazy_prod():
return reduce((lambda x,y: x*y),lst)
return lazy_prod
f = calc_prod([1, 2, 3, 4])
print f()闭包:
1
2
3
4
5
6
7
8
9
10def count():
fs = []
for i in range(1, 4):
def f():
return i
fs.append(f)
print fs
return fs
f1, f2, f3 = count() #f1() f2() f3() 都是3纯函数内加入条件判断
lambda x: -x if x < 0 else x面向对象编程 初始化过程中使用键值对:
1
2
3
4
5
6
7
8
9
10class Person(object):
def __init__(self, name, gender, birth, **kw):
self.name = name
self.gender = gender
self.birth = birth
for k, v in kw.iteritems():
setattr(self, k, v)
xiaoming = Person('Xiao Ming', 'Male', '1990-1-1', job='Student')
print xiaoming.name #Xiao Ming
print xiaoming.job #Studentdecorator装饰器
1
2
3
4
5
6
7
8
9
10
11
12
13
14
15
16
17
18
19
20
21def f1(x):
return x*2
def decorator(f):
def fn(x):
print 'Using decorator...\ncall ' + f.__name__+ '()'
return f(x)
return fn
f1 = decorator(f1)
print f1(5)
def f2(x):
return x*x
print f2(5)
#打印出了:
#Using decorator...
#call f1()
#10
#Using decorator...
#call f2()
#25编写无参数的decorator装饰器用于记录函数运行效率:
1
2
3
4
5
6
7
8
9
10
11
12
13
14
15
16import time
def performance(f):
def fn(*args, **kw):
t1 = time.time()
r = f(*args, **kw)
t2 = time.time()
print 'call %s() in %fs' % (f.__name__, (t2 - t1))
return r
return fn
def factorial(n):
return reduce(lambda x,y: x*y, range(1, n+1))
print factorial(10)
#call factorial() in 0.000005s
#3628800偏函数:
1
2
3
4
5import functools
sorted_ignore_case = functools.partial(sorted, cmp=lambda s1, s2: cmp(s1.upper(), s2.upper()))
print sorted_ignore_case(['bob', 'about', 'Zoo', 'Credit'])
#第一个cmp是sorted函数参数中的一个键
#输出['about', 'bob', 'Credit', 'Zoo']得到元素位置的index函数:
index() 函数用于从列表中找出某个值第一个匹配项的索引位置。
所以lis.index(min(lis))可以得到最小值的索引,numpy.argmin其实就是干这个的
累加函数
python31
2
3
4
5
6from itertools import accumulate
list(accumulate(range(10)))
#[0, 1, 3, 6, 10, 15, 21, 28, 36, 45]
import operator
list(accumulate(range(1,5), operator.mul))
#[1, 2, 6, 24]
易错点
- type(round(12.3))是float类型
- x[a:a+N]实际上x的长度就是N x[:a]+x[a:]==x
- 0 % N == 0.0 (N != 0)
- 普通数组是地址传递
1
2
3
4
5
6
7import numpy as np
a = np.arange(10)
b = a[3:6]
b[2] = 1000
# a竟然被b改变了,注意
print "a is "+ str(a) #a is [ 0 1 2 3 4 1000 6 7 8 9]
print "b is "+ str(b) #b is [ 3 4 1000] - numpy的std与Mathematica、Matlab不同
设置np.std(lis,ddof=1)即相同。原因在于方差是除以样本长度N(numpy默认),还是N-1(mathematica 无偏估计)。
python系统管理相关
查看python安装目录
1 | import sys |
pip升级包
pip install --pre mxnet-cu80 --upgrade
第三方库
scipy
包括fft,fftshift,窗函数等信号处理算法
Numpy
复数计算
X=np.array([1-1j, 1+0.000000000000001j, 4+9j],dtype=complex)
X.real得到实部 X.imag得带虚部
X.imag[np.abs(X.imag)<0.1]筛选出第二个元素
np.unwrap(np.angle(X))可以解卷绕X的相位
索引
一般索引
a=np.zeros((3,4))
a[:,1:3] 得到的是32的矩阵
a[:,[1]] 得到的是31的矩阵
a[:, 1 ] 得到的是(3,)的数组
根据条件索引
符合条件则x否则y
API:numpy.where(condition[, x, y])1
np.where([[True, False], [True, True]], [[1, 2], [3, 4]], [[9, 8], [7, 6]])
array([[1, 8],
[3, 4]])
只有条件的话返回condition.nonzero()
1 | x = np.arange(9.).reshape(3, 3) |
(array([2, 2, 2]), array([0, 1, 2]))
1 | x[np.where( x > 3.0 )] # Note: result is 1D. |
array([ 4., 5., 6., 7., 8.])
1 | np.where(x < 5, x, -1) # Note: broadcasting. |
array([[ 0., 1., 2.],
[ 3., 4., -1.],
[-1., -1., -1.]])
删除某一维度数据
np.delete(arr, 1, axis=0)1
2arr = np.array([[1,2,3,4], [5,6,7,8], [9,10,11,12]])
np.delete(arr, 1, 0)
array([[ 1, 2, 3, 4],
[ 9, 10, 11, 12]])
np.delete(arr, np.s_[::2], 1) 用np.s_构造索引
array([[ 2, 4],
[ 6, 8],
[10, 12]])
np.delete(arr, [1,3,5], None)
array([ 1, 3, 5, 7, 8, 9, 10, 11, 12])
all函数
1 | a=np.arange(-3,3) |
更改数据类型
astype函数
如a.astype(np.int32)
普通数组与numpy数组互转
1 | np.arange(3).tolist() #to list |
axis的理解
1 | a=np.arange(20).reshape(2,10) |
广播机制
1 | np.array([1,2])*np.array([3,4]) #np.array([3,8]) 行向量的内积 |
Element-wise
np.less([1, 2], [2, 2])返回array([True, False], dtype=bool)
行向量列向量的转化
1 | np.array([1, 2, 3, 4]).reshape((-1, 1)) # <--- THIS IS THE TRICK |
函数式编程
Outer
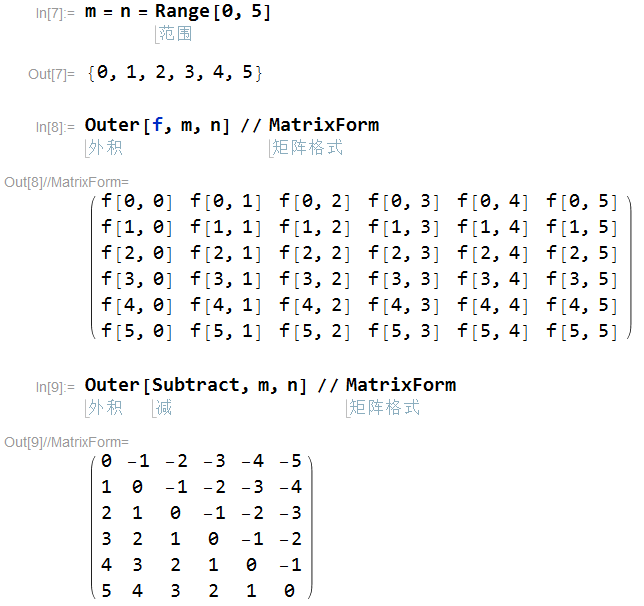
1 | m=np.arange(5); |
Inner
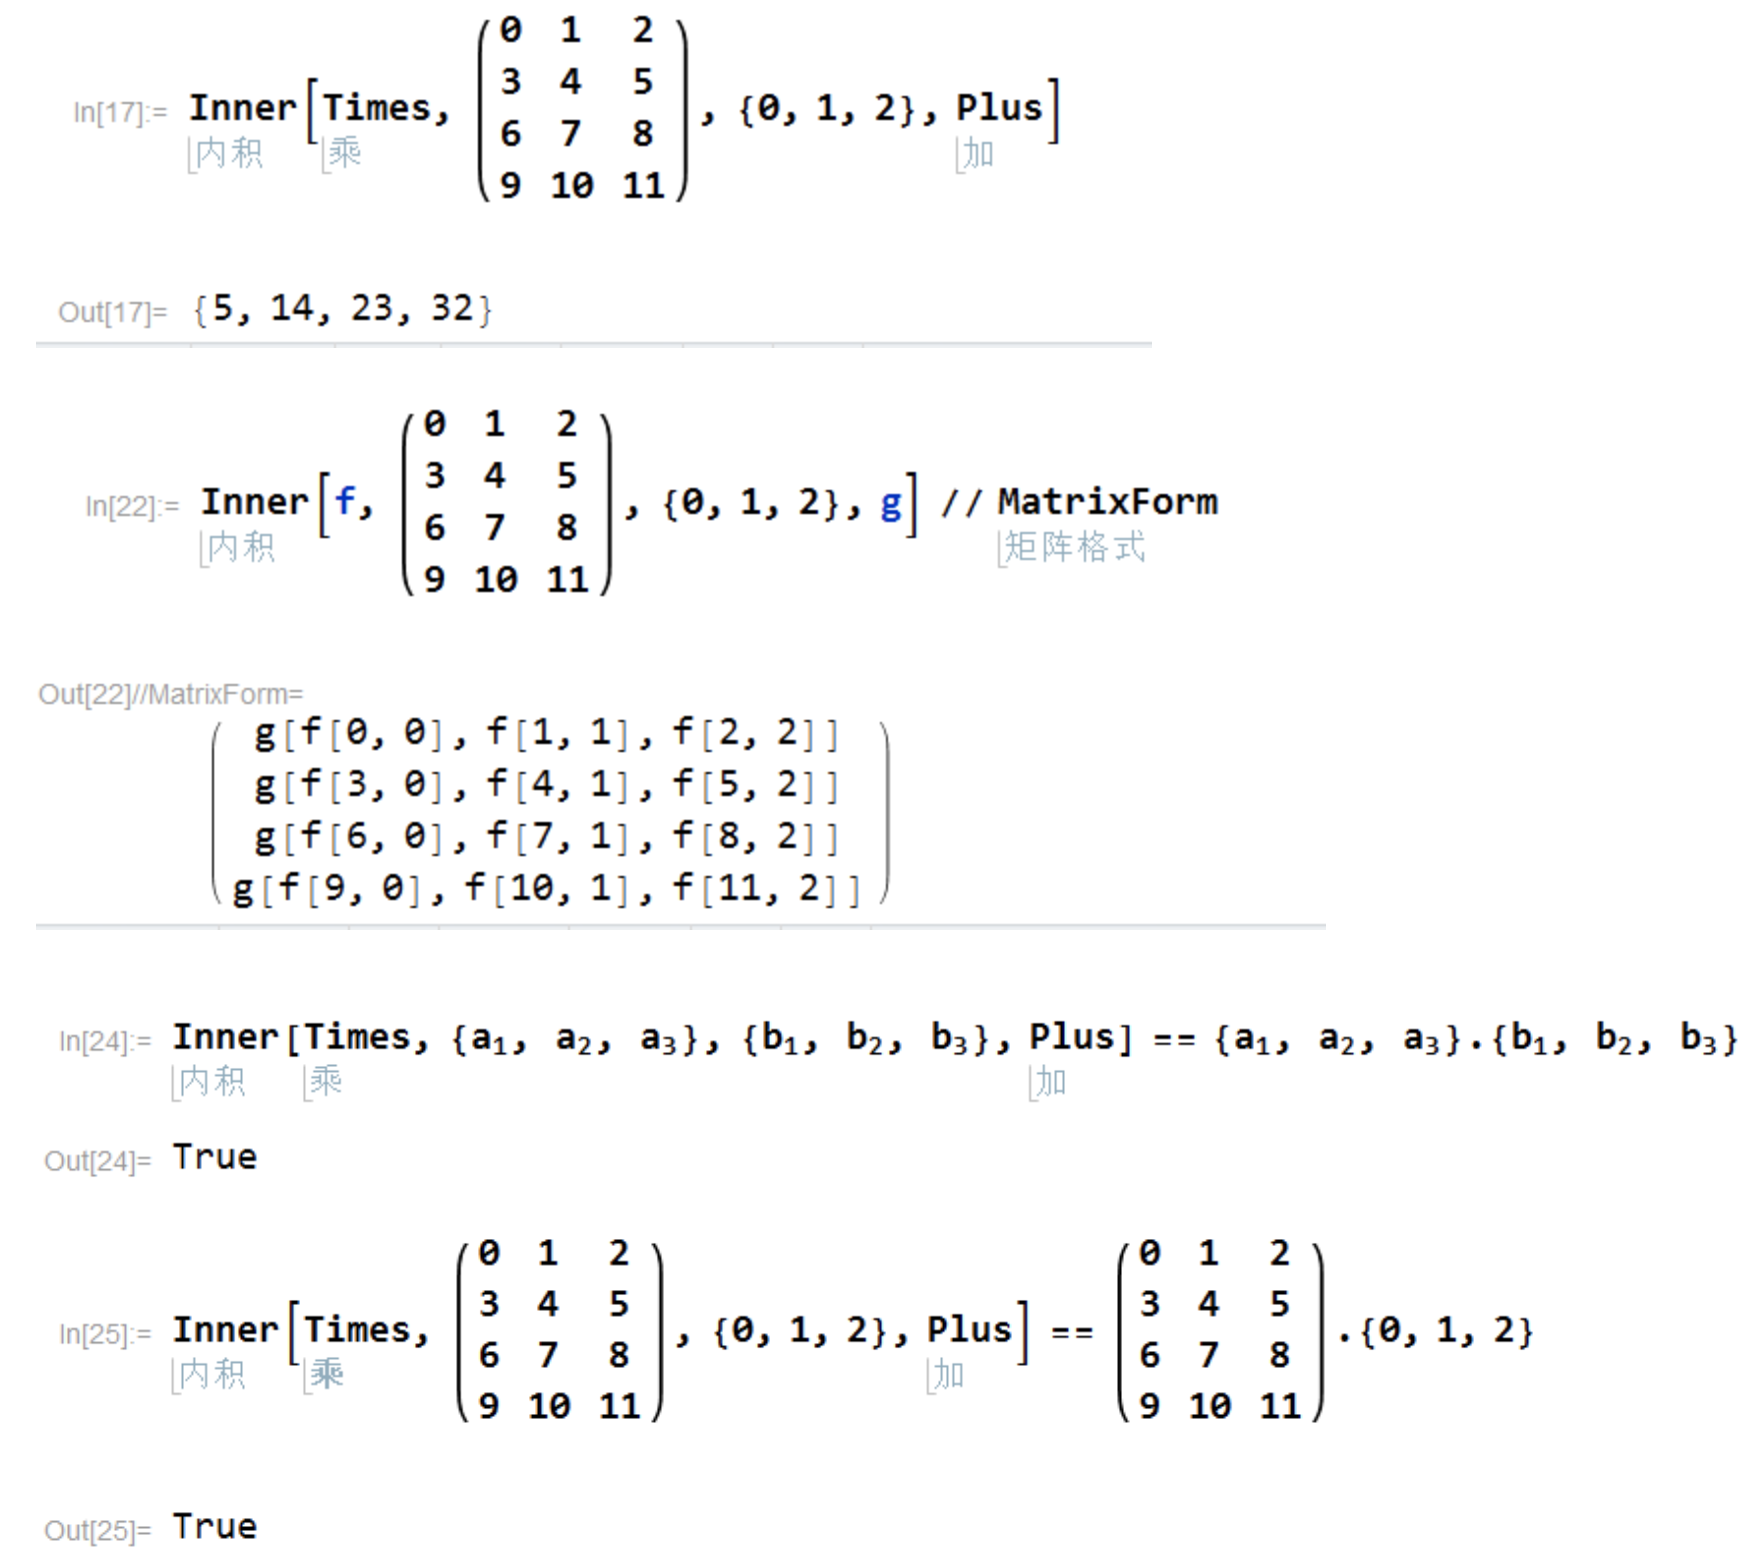
1 | a = np.arange(12).reshape((4,3)) |
拼接
标准数学形式的拼接
按列拼接
包括向量拼向量 向量拼矩阵 矩阵拼矩阵1
2
3
4
5
6a = np.array([1, 2, 3])
b = np.array([2, 3, 4])
c = np.vstack((a,b))
print c #array([[1, 2, 3], [2, 3, 4]])
print np.vstack((a,c)) #array([[1 2 3], [1 2 3], [2 3 4]])
print np.vstack((c,c)) #array([[1 2 3], [2 3 4], [1 2 3], [2 3 4]])
按行拼接
包括向量拼向量 向量拼矩阵 矩阵拼矩阵1
2
3
4
5
6a = np.array([[1], [2], [3]])
b = np.array([[2], [3], [4]])
c = np.hstack((a,b))
print c #array([[1, 2], [2, 3], [3, 4]])
print np.hstack((a,c)) #array([[1, 1, 2], [2, 2, 3], [3, 3, 4]])
print np.hstack((c,c)) #array([[1, 2, 1, 2], [2, 3, 2, 3], [3, 4, 3, 4]])
仿matlab式拼接
1 | a = np.array([[1, 2], [3, 4]]) |
多个numpy数组的拼接
1 | np.r_[np.array([1,2,3]), 0, 0, np.array([4,5,6])] |
数据的填充
1 | a = [1, 2, 3, 4, 5] |
array([1, 1, 1, 2, 3, 4, 5, 5, 5, 5])
1 | a = [[1, 2], [3, 4]] |
array([[1, 1, 1, 2, 1, 1, 1],
[1, 1, 1, 2, 1, 1, 1],
[1, 1, 1, 2, 1, 1, 1],
[1, 1, 1, 2, 1, 1, 1],
[3, 3, 3, 4, 3, 3, 3],
[1, 1, 1, 2, 1, 1, 1],
找到数据的unique元素
找到数组每个元素出现几次
mma代码1
2{1, 1, 1, 1, 5, 5, 3, 3, 3, 2, 2, 2, 2, 4} // Counts
<|1 -> 4, 5 -> 2, 3 -> 3, 2 -> 4, 4 -> 1|
保持顺序
python使用迭代器函数1
2
3from itertools import groupby
a = [1, 1, 1, 1, 5, 5, 3, 3, 3, 2, 2, 2, 2, 4]
[len(list(group)) for key, group in groupby(a)]
不保持顺序
采用np.unique函数1
2
3
4
5
6a = [1, 1, 1, 1, 5, 5, 3, 3, 3, 2, 2, 2, 2, 4]
np.unique(a, return_counts=True)
#(array([1, 2, 3, 4, 5]), array([4, 4, 3, 1, 2]))
from collections import Counter
Counter(a)
#Counter({1: 4, 2: 4, 3: 3, 5: 2, 4: 1})
matplotlib库
等值线图 ContourPlot
1 | %matplotlib inline |

三维图 Plot3D
1 | %matplotlib inline |

柱状图
1 | import matplotlib.pyplot as plt |

其他可视化库
- Seaborn:Seaborn跟matplotlib最大的区别就是它的默认绘图风格和色彩搭配都具有现代美感。由于Seaborn是构建在matplotlib的基础上的,你需要了解matplotlib从而来调整Seaborn的默认参数。
- 不要用Bokeh和ggplot2,前一个语法兼容不好,晦涩难懂,后一个作者弃坑了且bug多
- pygal超美丽,语法超简单,可以直接输出SVG的Tooltip形式的矢量图,但是只能输出SVG格式文件不能直接看图的效果
- plotly很美,也是神器之一!致力于交互图表的制作,但是它提供在别的库中很难找到的几种图表类型,比如等值线图,树形图和三维图表。如何离线使用参见Here! 美美哒~
但是由于我很熟悉Mathematica,作图基本上就是靠她了。如果是动态图,我使用JavaScript和D3。
可视化大规模数据集的库 Datashader
安装conda install -c bokeh datashader
1 | import datashader as ds |

在Jupyter中画图
3D散点图1
2
3
4
5
6
7
8
9
10
11
12
13%matplotlib notebook
from matplotlib import pyplot
from mpl_toolkits.mplot3d import Axes3D
import random
fig = pyplot.figure()
ax = Axes3D(fig)
sequence_containing_x_vals = X[:, 0].asnumpy()
sequence_containing_y_vals = X[:, 1].asnumpy()
sequence_containing_z_vals = y.asnumpy()
ax.scatter(sequence_containing_x_vals, sequence_containing_y_vals, sequence_containing_z_vals)
pyplot.show()
显示图像1
2
3%matplotlib inline
import matplotlib.pyplot as plt
plt.imshow(image_data)
操作系统库 os
- 调用系统cmd的ls程序打印当前目录,并且返回是否成功(0即为成功)
os.system('ls') - os.mkdir(path)函数创建目录(创建一级目录)
- os.makedirs(path)函数创建多级目录
- os.listdir(path)可以得到一个包含当前目录下文件和子目录的List列表(但是是乱序的,需要sorted)
- os.walk() 方法用于通过在目录树种游走输出在目录中的文件名,向上或者向下
- os.path.split 用于分割路径为目录路径和不带后缀的文件名
- os.path.split 得到不带后缀的文件名
显示进度条
1 | from time import sleep |
print("Epoch %d" % epoch)可以改为tqdm.write("Epoch %d" % epoch)
找到某一后缀的文件 glob库
1 | import glob |
递归查找可以用glob2库,注意使用了 **1
2import glob2
print glob2.glob("./source/**/*.cpp")
h5py使用指南
读取h5文件
1 | import h5py |
多进程和多线程库
1 | import multiprocessing |
简单示例 (结合深度学习)
创建一个输入,一个输出的的网络所需的hdf5文件
新版
1 | import numpy as np |
旧版
1 | import os |
Python小工具
多进程加快迭代速度
原始代码:1
2
3
4
5
6import glob
dir = './wav_phone'
sum = 0
for filename in glob.glob(os.path.join(dir,"*.wav"))[:10000]:
sum += len(open(filename, 'rb').read())
print sumtime python test.py输出
43567952
python test.py 1.01s user 0.66s system 98% cpu 1.688 total
改进后:1
2
3
4
5
6
7
8
9
10
11
12import glob, concurrent.futures
def load(f):
return len(open(f, 'rb').read())
dir = './wav_phone'
sum = 0
with concurrent.futures.ProcessPoolExecutor() as executor:
files = glob.glob(os.path.join(dir,"*.wav"))[:10000]
for i in executor.map(load, files):
sum += i
print sumtime python test.py输出
43567952
python test.py 3.48s user 2.03s system 148% cpu 3.724 total
检查两个文件夹是否完全一样
不一样的会打印出对应的文件1
2
3
4
5
6
7
8
9
10
11
12
13
14
15
16
17
18
19
20
21
22
23
24
25
26#-*- coding: utf-8 -*-
import os
from glob import glob
#ref_Dir1是参考文件夹 通常文件夹内文件会少一些
ref_Dir1 = r'\\172.16.46.88\xzhou\Downloads\Yanping_13k_NFE\Unit2Vec_WaveformGeneration\online\hus_rootDir\hus_WaveRNN'
Dir2 = r'\\172.16.46.80\xzhou2\Yanping_13k_NFE\Unit2Vec_WaveformGeneration\online\hus_rootDir\hus_WaveRNN'
#指比较suffix的文件,全部文件suffix = '*'
suffix = '*.wav'
SameNum = 0.
AllNum = 0.
files = sorted(glob(os.path.join(ref_Dir1,suffix)))
print 'reference dir is %s' % ref_Dir1
for file in files:
bn = os.path.basename(file)
print 'process %f%%\r' % (AllNum/len(files)*100),
file1 = os.path.join(ref_Dir1, bn)
file2 = os.path.join(Dir2, bn)
SameQ = open(file1,'rt').read() == open(file2,'rt').read()
if SameQ:
SameNum += 1
else:
print '%-20s' % bn
AllNum += 1
print 'Similar rate is %f%%' % (SameNum/AllNum*100)
得到一个复杂工程(文件夹)的目录树,并将代码说明等输出至另一文件夹
目的是备份代码以及说明文件1
2
3
4
5
6
7
8
9
10
11
12
13
14
15
16
17
18
19
20
21
22
23
24import os,shutil
originalDir = './dir'
targetDir = './dir_code'
suffix = ['.py','.cpp','.hpp','.c','.h','.pl','.nb','.m','.js','.html','.doc','.docx','.ppt','.pptx','.xls','.xlsx','.pdf','.jpg','.png','.gif','.txt']
for dirName, subdirList, fileList in os.walk(originalDir):
print dirName
for mydir in subdirList:
Ori_abspath_this = os.path.join(dirName, mydir)
relative_Path = os.path.relpath(Ori_abspath_this, originalDir)
Tar_abspathy_this = os.path.join(targetDir, relative_Path)
try:
if not os.path.exists(Tar_abspathy_this):
os.mkdir(Tar_abspathy_this)
except:
os.makedirs(Tar_abspathy_this)
for myfile in fileList:
if os.path.splitext(myfile)[1] in suffix:
Ori_abspath_this = os.path.join(dirName, myfile)
relative_Path = os.path.relpath(Ori_abspath_this, originalDir)
Tar_abspathy_this = os.path.join(targetDir, relative_Path)
shutil.copyfile(Ori_abspath_this,Tar_abspathy_this)
检查项目某些代码代码是否都包含了某些字符
比如有memcpy的行是否都包含sizeof
使用了glob2库 这个相比glob不仅可以找到目录下的特定后缀文件还可以递归查询它的子目录下的文件1
2
3
4
5
6
7
8
9
10
11import glob2
files=glob2.glob("./source/**/*.cpp")
for file in files:
num=0
for line in open(file,'rt'):
num=num+1
line=line.strip()
if line.startswith('memcpy'):
if('sizeof' not in line):
print line+'\t\t'+file+'\t'+str(num)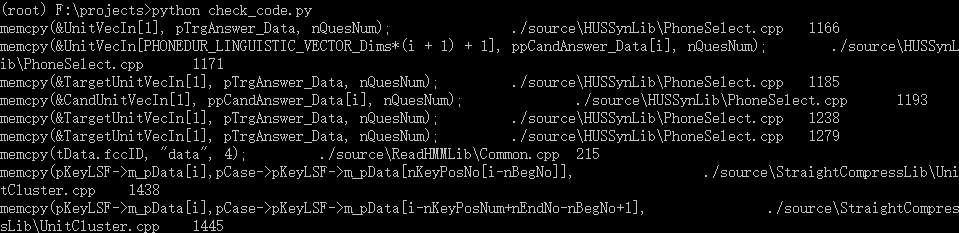
可以显示行 文件名 行号,效果还是不错的,因为可以自定义呀~
导入导出数据
清除文件数据
1 | with open('test.txt','w') as f_out: |
准备维基百科中文语料库
参考网址[]
文本数据
np.loadtxt
忽略首行,数据是浮点数np.loadtxt('test.txt',dtype=float,skiprows=1)
读取特定的列使用参数usecols,多列是usecols=(1,3),单列是usecols=(3,)
np.genfromtxt
只读取第一三列浮点数据且忽略首行np.genfromtxt('test.txt',dtype=float,usecols=(1,3),skip_header=1)
实例
1 | import numpy as np |
二进制数据
快速读取二进制数据
1 | #速度慢 |
实例
1 | import numpy as np |
导出字典(使用JSON)
打印到屏幕
indent可以控制缩进单位,美化JSON用的print json.dumps(mydict, indent=2)
输出到文件1
2with open('Unit2Vec_tSNE.json', 'w') as outfile:
json.dump(mydict, outfile, indent=2)
导出字典(使用pickle)
可以保存字典、列表、numpy数据等
pickle.dump(数据, 文件,[使用协议])表示将要持久化的数据,保存到文件中,使用协议有3种,索引0为ASCII,1是旧式2进制,2是新式二进制协议,不同之处在于后者更高效一些。默认的话dump方法使用使用协议0。1
2
3
4
5
6
7
8
9
10
11
12
13
14
15
16
17
18
19
20
21
22
23import pickle
import numpy as np
data1 = {'a': [1, 2.0, 3, 4+6j],
'b': ('string', u'Unicode string'),
'c': None}
data2 = [1, 2, [3,4,5]]
data3 = np.arange(5)
with open('data.pkl', 'wb') as output_file:
# Using -1 to make it more stable and less file size
pickle.dump(data1, output_file, -1)
pickle.dump(data2, output_file, -1)
pickle.dump(data3, output_file, -1)
with open('data.pkl', 'rb') as input_fine: #must be 'rb' in Windows
data4 = pickle.load(input_fine)
data5 = pickle.load(input_fine)
data6 = pickle.load(input_fine)
print data4
print data5
print np.sum(data6) #0+1+2+3+4==10
Anaconda使用备忘录
安装环境
conda create -n 环境名
conda create -n 环境名 python=3.6
删除环境
conda remove -n 环境名 –all
查看所处环境
conda info -e
升级Conda
conda update conda
解决错误
出现Intel MKL FATAL ERROR: Cannot load libmkl_avx2.so or libmkl_def.so错误
执行conda install nomkl就可以了。在计算DTW算法的库时遇到
解决h5py的⚠️
pip install numpy==1.13.0
找不到conda
对于Linux: 如果最终conda not found 只需要终端输入export PATH="/home/xzhou/anaconda2/bin:$PATH"就行,为了永久生效加入这行代码进~/.bashrc, 然后source ~/.bashrc
对于window: scripts文件夹路径作为环境变量
ipython的环境不正常
当激活一个环境后 ipython的sys.executable不对劲
只需要conda install ipython进行了Reactivate the environment or run hash -r (in bash) or rehash (in zsh). 就行了
Conda不能联网
注意当conda不能用时可以考虑使用手机USB共享网络,但是一定要关闭微软输入法,不然会导致蓝屏。最好用4G网络,更新顺利。使用科大镜像
1 | # 优先使用清华 conda 镜像。 |
待Check
如果conda create -n test_env python=2.7 创建出的环境并不在envs里,那么执行
conda create –prefix /tmp/test-env python=2.7